Fly Tying with Porcupine Quills ~ Part 1
The North American Porcupine, otherwise known as the Canadian Porcupine, is a large rodent that can potentially change the way you tie flies overnight.
Porcupine quills vary in size from very short and slender to thick and long, with these variables you can use them for extended abdomens on just about any insect. If you happen upon a porcupine carcass do not pass it up, one specimen can provide you a lifetime supply of quills. I found my first porcupine up in the Alleghenies along a train track. I spent nearly two hours carefully plucking quills using my forceps and placing them into a few fly boxes from my vest. Be careful!
How to Dye Your Quills:
1) Porcupine quills are hollow making them perfect for extended bodies. Quills are very bouyant. The quills are easily dyed using Veniard's or Ritt. After acquiring your porcupine quills carefully soak them in a warm Dove soap solution. Place them in a large tea infuser and submerge them in the solution for around 30 minutes. After soaking them wash them thoroughly, still in the infuser, with warm water under the faucet. Place each quill individually on a paper towel and let them dry thoroughly.
2) Your quills are now ready to be dyed once you remove the very sharp tips at both ends. Simply use a cuticle scissor and snip the very tips but do not cut into the chambered portion of the quill.
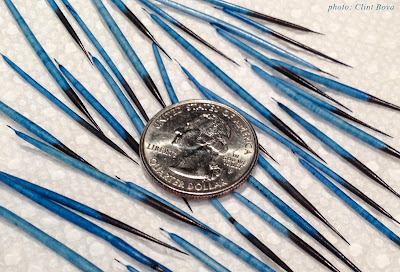
The above photo shows the removed quill
points and before and after color
3) Select the size quill you will be using for the specific insect. If its a mayfly you might want a smallish sized quill or if its a Drake a medium sized one etc... The great thing about the North American Porcupine is that it has many different sized quills suitable for a myriad of different insects.
4) Use this recipe for dying your quills:
I use an old coffee maker and pour 8 cups of water into the coffee maker or heat 8 cups of water on your stove top in a Pyrex vessel. Pour 2 tablespoons of distilled white vinegar in and heat to 140 degrees. Then take your liquid dye and mix 3 tablespoons of desired color. Agitate the solution and stir well. Place the quills back into the large tea infuser and place it into the dye bath. Agitate the infuser every two minutes. The longer you keep your quills in the bath the more saturated the color will become so use artistic license when it comes to your desired insect color of choice. After you get the color desired place the infuser immediately under cold water spigot. This stop bath of cold water is an important step. After two minutes under the stop bath take your quills out of the infuser and let them dry on a paper towel thoroughly.
The porcupine quill is the perfect material for extended bodies simply snip it at an angle to the desired length and tie it onto the hook shank. In my Part 2 section next you can see how I tie my “Porcupine Damsel Fly”
check out my fly pattern shorts on my YouTube channel by clicking the link below:


